After quite a while where very little progress has happened because of the pandemic, the Penrhyn Coach received some serious attention during the month when it was moved from the carriage shed into the warmth of the loco shed.
David Hale, who constructed this masterpiece next to his house in Somerset, takes up the story of his busy visit:
The Covid pandemic has stopped any progress since October 2020 when I had to escape home promptly before Welsh restrictions came into force, hence my visit during September this year was the first opportunity to make some serious progress with all parties free of commitments and available to assist.
The objective over the four day visit was two-fold. Firstly, to apply canvas to the roof of the carriage and secondly, to cut and fix half round moulding to the sides of the carriage to define the areas to be painted different colours.
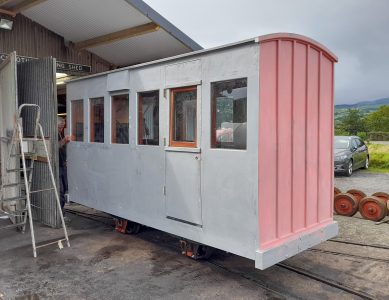
Penrhyn Coach before fitting of roof covering
With just myself and Julian dealing with applying the canvas over an area measuring about four metres by two metres, it was clear that we could be faced with a rather difficult task. Traditionally the canvas is applied using a thick, bright yellow adhesive known as canvas bonding compound which is based on linseed oil and chalk, similar to glazing putty but rather thinner in constituency and very, very sticky! The normal procedure is to apply a layer of the compound to the roof before laying and stretching the canvas over it followed by a further coat of the compound over the canvas to provide a waterproof finish. It’s obviously a very messy process and I envisaged that having applied the first layer of the compound, we might find it physically impossible to pull the canvas over it without getting creases in it and trapping air bubbles underneath. I proposed a rather different approach which, although unconventional, should produce a satisfactory outcome and be easier for two of us to handle.
The canvas was first laid over the roof of the carriage with about 100mm hanging over the edges to allow any pre-existing creases to be removed. Hardwood battens extending the full length of the carriage were prepared from 40mm x 12mm section timber with holes for screws drilled at 150mm spacing through the thickness. On one side of the carriage the canvas was rolled back a little way, and the batten was screwed to the edge of the roof. The batten was removed, the canvas allowed to drop down again, and the batten was replaced, trapping the canvas in place. Now the canvas could be pulled back off the roof allowing it to fall down the side of the carriage whilst being restrained by the batten. The other batten was screwed to the second side to ensure correct location and again removed for the time being. Now the unconventional approach could begin.
The whole of the roof was quickly coated with a generous coating of P.V.A. wood glue, the canvas was pulled back over the roof and then using a plastering trowel, the canvas was stretched and all trapped air was removed before the second batten was re-attached to keep the canvas taught. More P.V.A. was applied over the canvas, and the trowel was used to ensure the whole area was covered. The theory was that the glue would penetrate the canvas and as was the case when aircraft were built in both World Wars, the canvas would shrink. We adjourned for the evening, and on returning the next morning found the canvas firmly attached to the roof with no creases or air bubbles.
It was now possible to remove the battens once more. They were then screwed upwards into the part of the roof which overlaps the sides of the carriage, trapping the overlapping 100mm of the canvas.
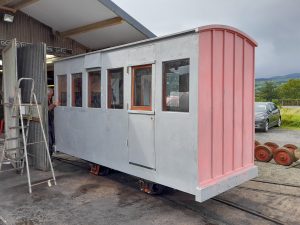
Penrhyn Coach following fitting of roof covering
Now the application of the bonding compound could begin. Julian applied a very thin layer to fill the pores in the canvas using the plastering trowel whilst I trimmed the canvas where it overlapped the ends of the carriage “sticking” it in place using bonding compound. Again it was necessary to leave overnight, this time to allow the compound to begin to set.
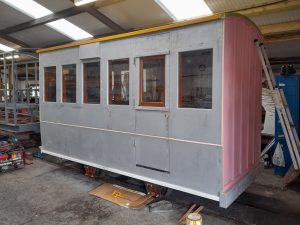
The following day I had lost my ‘assistant’ who was otherwise engaged so I began by cutting and fitting the mouldings to the sides of the carriage. Since the moulding was to run the length of the carriage at the level of the tumblehome, and then up the edges of the sides, mitres were cut carefully where they were to join. Once all of the pieces had been cut, glue was applied and they were pinned in place. Once the carriage has been painted, the mouldings will be masked off and gold paint will be used to highlight them.
Having completed the mouldings, I returned to the roof. Working off a ladder as we had done the previous day, I could reach a little over half way across the roof. With the plastering trowel, a more liberal layer of the bonding compound was applied, at the same time trying to maintain an even thickness and avoiding trowel marks. As mentioned earlier, the bonding compound is very sticky. Leaning across the roof it was inevitable that that I would get it on the front of my overall jacket. By the end of that afternoon I probably resembled a Canary!!
That completes my summary of what was achieved over four days. To complete the work on the roof, compound must be applied to the edges to seal them against the ingress of water. However, we must now wait for the compound to set completely before any more progress can be made so that will be on my next visit, hopefully unaffected by a further lockdown.
We use cookies to ensure that we give you the best experience on our website. If you continue to use this site we will assume that you are happy with it.